Remote config support
In this guide, we'll add Cylindo remote config support to a Shopify store.
If the products of your store are configured with different, multiple remote configs, please jump to this section of the guide.
Edit the theme code
Click on the current theme's menu button, and select Edit code. Open the file product-media-gallery.liquid. You'll now replace the code by this one:
<cylindo-viewer
  customer-id="YOUR CUSTOMER ID"
  code="{{ product.handle }}"
  remote-config="YOUR CURATOR VIEWER ID"
  configuration="{% for option in product.options_with_values %}{{ option.name }}:{{ option.selected_value }},{% endfor %}"
>
  <cylindo-shopify-integration
    features-by-variant-id='{ {% for variant in product.variants %}"{{ variant.id }}": { {% for option in product.options_with_values %}{{ option.name | json }}: {{ variant.options[forloop.index0] | json }}{% unless forloop.last %},{% endunless %}{% endfor %} }{% unless forloop.last %},{% endunless %}{% endfor %} }'
  ></cylindo-shopify-integration>
</cylindo-viewer>
Don't forget to replace the YOUR CURATOR VIEWER ID and YOUR CUSTOMER ID values with your own.
Click on the Save button, and preview the store. The remote config should now load successfully.
Multiple remote config support
In the case your products don't share the same remote config, we need to store their respective curator viewer id in Shopify. We'll do that in a product-level metafield.
Add the metafield definition
Click on the Settings button on the Shopify admin dashboard left panel, then select Custom data and Products as depicted below. This should list all product-level metafields. Click on the Add definition button:
Fill in the fields with the following values:
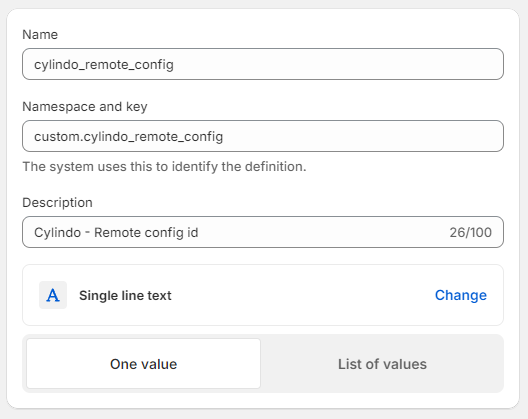
Click Save, then close the settings.
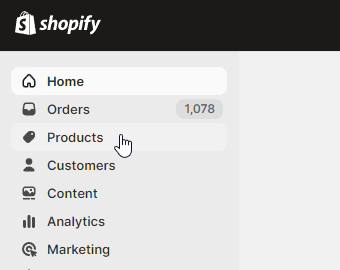
Configure the products
Select the Products menu in the left side panel:
You should see a list of all products in your store. Select every product you plan to integrate the viewer with, and click the Bulk edit button. You'll be presented with an interface where you can edit every field of every products you selected. Make sure the cylindo_remote_config column appears by selecting it in the Columns button, such as depicted here:
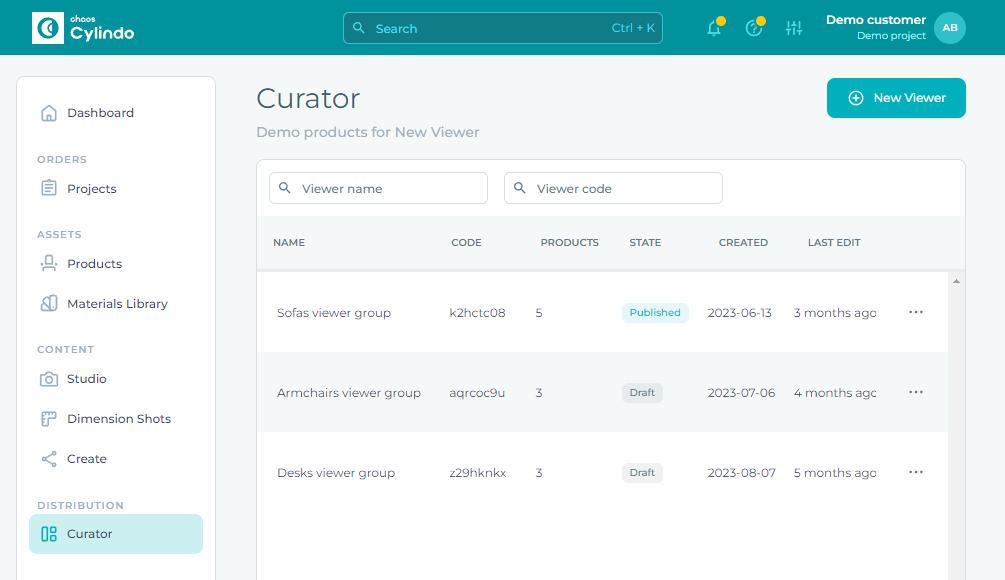
In another tab, go on your Cylindo curator page. You should see every viewer groups you created, with their respective curator viewer id in the second column:
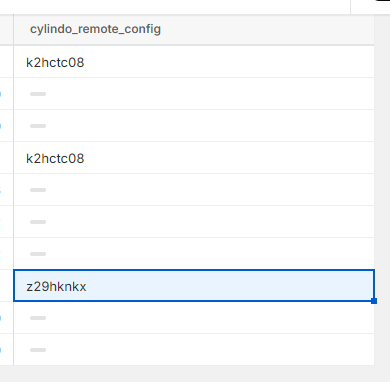
For every product, copy the Cylindo curator viewer id into its corresponding cylindo_product_code cell in the Shopify interface. The end result should look like this:
Click on the Save button at the top right corner, and go back to the homepage of the Shopify admin dashboard.
Edit the theme code
Your products are now well-configured, but we still need to make some changes to the theme custom code.
Click on the current theme's menu button, and select Edit code. Open the file product-media-gallery.liquid. Replace it with the following:
<cylindo-viewer
  customer-id="YOUR CUSTOMER ID"
  code="{{ product.handle }}"
  remote-config="{{ product.metafields.cylindo.cylindo_remote_config }}"
  configuration="{% for option in product.options_with_values %}{{ option.name }}:{{ option.selected_value }},{% endfor %}"
>
  <cylindo-shopify-integration
    features-by-variant-id='{ {% for variant in product.variants %}"{{ variant.id }}": { {% for option in product.options_with_values %}{{ option.name | json }}: {{ variant.options[forloop.index0] | json }}{% unless forloop.last %},{% endunless %}{% endfor %} }{% unless forloop.last %},{% endunless %}{% endfor %} }'
  ></cylindo-shopify-integration>
</cylindo-viewer>
Don't forget to replace YOUR CUSTOMER ID with your own Cylindo Customer ID.
Click on the Save button, and preview the store. The config should now load correctly.