Shopify Integration
The purpose of this guide is to integrate the Cylindo Viewer into a Shopify online store.
In most cases, this integration should be as straightforward as adding a few scripts. However, depending on how your Shopify and Cylindo projects are configured, additional steps might be needed.
Pre-Requisites
- A Shopify online store running a Shopify Online Store 2.0 theme. This guide should work on other themes, but some adjustments might be necessary.
- A Cylindo Customer ID
- Configured Cylindo products matching every store product
- Familiarity with Shopify's Admin Interface
Edit the Shopify theme code
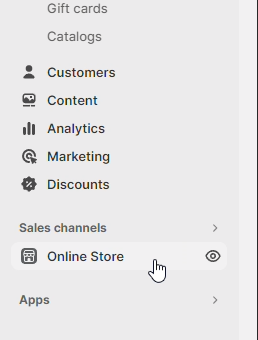
First, go on your Shopify admin dashboard. Make sure you select the store where you plan to integrate the viewer.
Select your online store on the left panel:
Click on the current theme's menu button, and select Edit code.
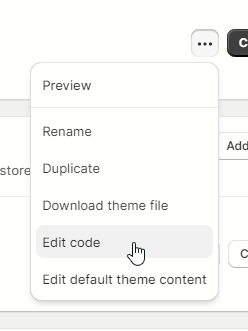
You'll then access an interface where you can edit every file of your store's current theme.
Add the imports to the theme
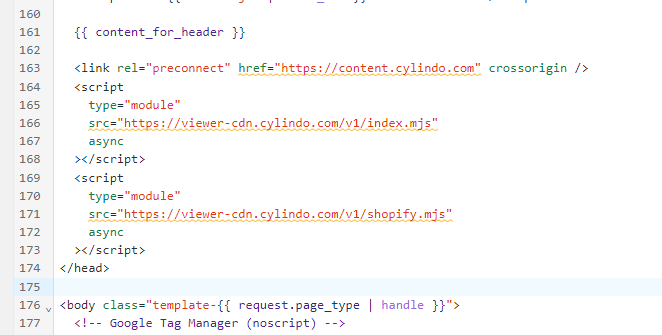
Search for the file theme.liquid, and open it.
This file contains all the external scripts imports.
Locate the code {{ content_for_header }} in the file, and add the following block below:
<link rel="preconnect" href="https://content.cylindo.com" crossorigin />
<script
  type="module"
  src="https://viewer-cdn.cylindo.com/v1/index.mjs"
  async
></script>
<script
  type="module"
  src="https://viewer-cdn.cylindo.com/v1/shopify.mjs"
  async
></script>
Click the Save button on the top right corner.
The whole code section should look like this:
If you want to include a Thumbnail bar, you should also add the following code to the copied block:
<script
  type="module"
  src="https://viewer-cdn.cylindo.com/v1/bar.mjs"
  async
></script>
Add the viewer to the theme
We will now locate the code responsible for displaying the product gallery, in order to replace it with the viewer.
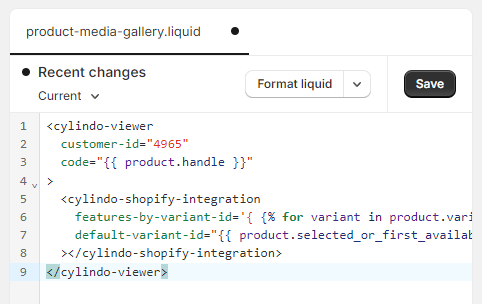
Search for the file product-media-gallery.liquid, and open it.
If your theme is not one of the 10 most popular Shopify themes, this file might not exist. In that case, look for a file named main-product.liquid, product.liquid or product-template.liquid. This file should contain the elements that will be displayed on your product page, including the gallery that you'll have to replace. If this doesn't help, please refer to your theme's documentation.
Replace the content of the whole file with the following code:
If you previously went through the old Shopify integration guide and have your cylindo_features and cylindo_product_code metafields configured and populated, please copy the code from the "Metafield method".
- Default method
- Metafield method
<cylindo-viewer customer-id="YOUR CUSTOMER ID" code="{{ product.handle }}">
  <cylindo-shopify-integration
    features-by-variant-id='{ {% for variant in product.variants %}"{{ variant.id }}": { {% for i in (0..product.options.size-1) %}{{ product.options[i] | json }}: {{ variant.options[i] | json }}{% unless forloop.last %},{% endunless %}{% endfor %} }{% unless forloop.last %},{% endunless %}{% endfor %} }'
    default-variant-id="{{ product.selected_or_first_available_variant.id }}"
  ></cylindo-shopify-integration>
</cylindo-viewer>
<cylindo-viewer
  customer-id="YOUR CUSTOMER ID"
  code="{{ product.metafields.cylindo.cylindo_product_code }}"
>
  <cylindo-shopify-integration
    features-by-variant-id='{ {% for variant in product.variants %}"{{ variant.id }}": {{ variant.metafields.cylindo.cylindo_features }}{% unless forloop.last %},{% endunless %}{% endfor %} }'
    default-variant-id="{{ product.selected_or_first_available_variant.id }}"
  ></cylindo-shopify-integration>
</cylindo-viewer>
Replace YOUR CUSTOMER ID by your own Cylindo Customer ID. The end result should look like this:
You can customize the viewer as you want, by copying one of the documentation examples. Here's a few relevant implementation examples:
- Preloading example
- Thumbnail bar example
- Remote config example
- Shopify medias example
- Custom integration
This example follows the Preloading best practice. This improves SEO.
Don't forget to replace YOUR CUSTOMER ID by your own value.
<cylindo-viewer>
  {% capture placeholder_features %}{% for option in product.options_with_values %}{% assign option_index = forloop.index0 %}{{ option.name }}:{{ product.selected_or_first_available_variant.options[option_index] }}{% unless forloop.last %}&feature={% endunless %}{% endfor %}{% endcapture %}
  <img
    alt="cylindo-viewer-placeholder"
    slot="placeholder"
    src="https://content.cylindo.com/api/v2/YOUR CUSTOMER ID/products/{{ product.handle }}/frames/default.webp?feature={{ placeholder_features }}"
    style="object-fit:contain;width:100%;height:100%"
  />
  <cylindo-shopify-integration
    features-by-variant-id='{ {% for variant in product.variants %}"{{ variant.id }}": { {% for i in (0..product.options.size-1) %}{{ product.options[i] | json }}: {{ variant.options[i] | json }}{% unless forloop.last %},{% endunless %}{% endfor %} }{% unless forloop.last %},{% endunless %}{% endfor %} }'
    default-variant-id="{{ product.selected_or_first_available_variant.id }}"
  ></cylindo-shopify-integration>
</cylindo-viewer>
This example follows the Thumbnail bar example.
Don't forget to replace YOUR CUSTOMER ID by your own value.
<cylindo-viewer customer-id="YOUR CUSTOMER ID" code="{{ product.handle }}">
  <cylindo-shopify-integration
    features-by-variant-id='{ {% for variant in product.variants %}"{{ variant.id }}": { {% for i in (0..product.options.size-1) %}{{ product.options[i] | json }}: {{ variant.options[i] | json }}{% unless forloop.last %},{% endunless %}{% endfor %} }{% unless forloop.last %},{% endunless %}{% endfor %} }'
    default-variant-id="{{ product.selected_or_first_available_variant.id }}"
  ></cylindo-shopify-integration>
  <cylindo-360-frame frame="10"></cylindo-360-frame>
  <cylindo-360 frame="3"></cylindo-360>
  <cylindo-model></cylindo-model>
  <cylindo-dimension-shot
    dimension-code="UXPP"
    unit="Cm"
  ></cylindo-dimension-shot>
  <cylindo-thumbnail-bar></cylindo-thumbnail-bar>
</cylindo-viewer>
This example follows the Remote config example.
Don't forget to replace YOUR CUSTOMER ID and YOUR CURATOR VIEWER ID with your own values.
For more information about using a remote config with Shopify, please follow this additional guide.
<cylindo-viewer
  customer-id="YOUR CUSTOMER ID"
  code="{{ product.handle }}"
  remote-config="YOUR CURATOR VIEWER ID"
>
  <cylindo-shopify-integration
    features-by-variant-id='{ {% for variant in product.variants %}"{{ variant.id }}": { {% for i in (0..product.options.size-1) %}{{ product.options[i] | json }}: {{ variant.options[i] | json }}{% unless forloop.last %},{% endunless %}{% endfor %} }{% unless forloop.last %},{% endunless %}{% endfor %} }'
    default-variant-id="{{ product.selected_or_first_available_variant.id }}"
  ></cylindo-shopify-integration>
</cylindo-viewer>
This example adds the Shopify product media images in the viewer, as custom content.
This example can be combined with the remote-config one; In that case, the product medias will be added after the curator items.
Don't forget to replace YOUR CUSTOMER ID by your own value.
<cylindo-viewer customer-id="YOUR CUSTOMER ID" code="{{ product.handle }}">
  <cylindo-shopify-integration
    features-by-variant-id='{ {% for variant in product.variants %}"{{ variant.id }}": { {% for i in (0..product.options.size-1) %}{{ product.options[i] | json }}: {{ variant.options[i] | json }}{% unless forloop.last %},{% endunless %}{% endfor %} }{% unless forloop.last %},{% endunless %}{% endfor %} }'
    default-variant-id="{{ product.selected_or_first_available_variant.id }}"
  ></cylindo-shopify-integration>
  {%- for media in product.media -%}
  <cylindo-custom-content
    slot="{{  forloop.index }}"
    thumbnail-src="{{ media | image_url: width: 128 }}"
  >
    <img src="{{ media | image_url }}" />
  </cylindo-custom-content>
  {%- endfor -%}
  <cylindo-360></cylindo-360>
  <cylindo-thumbnail-bar></cylindo-thumbnail-bar>
</cylindo-viewer>
If you need more control over the viewer integration, you can opt-out of the cylindo-shopify-integration component by running a custom js code. By doing so, keep in mind that you won't be able to receive any additional feature or bugfix from an update of this component.
The following code should be functionally equivalent to the main example.
Don't forget to replace YOUR CUSTOMER ID by your own value.
<cylindo-viewer
  customer-id="YOUR CUSTOMER ID"
  code="{{ product.handle }}"
></cylindo-viewer>
And, at the bottom of the same file:
<script>
  customElements.whenDefined("cylindo-viewer").then(function() {
    const viewer = document.querySelector('cylindo-viewer');

    const variants = {
      {% for variant in product.variants %}
        {{ variant.id }}: {
          {% for i in (0..product.options.size-1) %}
            {{ product.options[i] | json }}: {{ variant.options[i] | json }},
          {% endfor %}
        },
      {% endfor %}
    };

    let variantId = {{ product.selected_or_first_available_variant.id }};

    const updateViewerFeatures = () => {
      const features = variants[variantId];
      if (!features) return;
      viewer.features = features;
    }

    updateViewerFeatures();

    // update viewer on variant change
    const getVariantIdFromSearch = (search) => {
      const match = search.match(/variant=([0-9]+)/);
      if (!match) return null;
      return parseInt(match[1]);
    }

    const onChangeDetected = () => {
      const newVariantId = getVariantIdFromSearch(window.location.search);
      if (newVariantId === variantId) return;
      variantId = newVariantId;
      updateViewerFeatures();
    }

    // if a Shopify variant selector is detected, we listen for its change event
    const variantSelector = document.querySelector(
      "variant-selects, variant-radios"
    );
    if (variantSelector) {
      variantSelector.addEventListener("change", onChangeDetected);
      return;
    }

    // if not, we use a MutationObserver
    const observer = new MutationObserver(onChangeDetected);
    observer.observe(document, {subtree: true, childList: true});
  });
</script>
Click on the Save button, and then on the Preview store button located right above. You should now see a preview of your store.
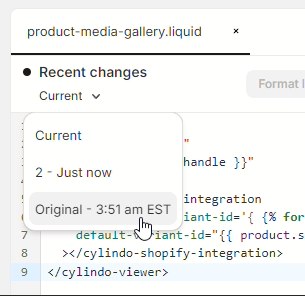
If you want to go back to a previous version of your theme, you can do so by selecting it under the Recent changes section:
Conclusion
Verify that the viewer operates correctly and without issues across all products. If no problem is to be reported, your theme is now ready to be published.
Troubleshooting
If an error message appeared in place of the viewer, additional steps are required:
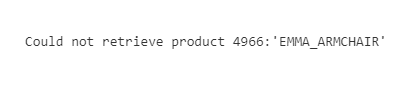
Error: Could not retrieve product
Please follow this additional guide if you got an error message similar to this one:
Error: A feature with the specified code does not exist
Please follow this additional guide if you got an error message similar to this one:
